
Ever wondered what your airbrushing kit might be missing? Our featured accessory might be it! If you are sick and tired of the grueling cleanup you have to deal with after you clean out your airbrush, then this is just the thing for you. Introducing: the Ninesteps Industries Airbrush Cleaning Pot, a must-have tool when airbrushing. In this blog, we’ll be showing you why this handy tool should be in everyone’s airbrushing kit and talk about how to use it while teaching you a trick or two. Let's get started!
Summary
- What is NINESTEPS’ Airbrush Cleaning Pot?
- How to Use NINESTEPS’ Airbrush Cleaning Pot (Step-by- Step Instructions)
- Watch and learn from following our video
What is NINESTEPS’ Airbrush Cleaning Pot?
The Ninesteps Airbrush Cleaning Pot is a handy airbrush accessory that contains the paint during clean-up. Instead of spraying paint everywhere just to rinse it, the cleaning pot collects all the paint in one place where it is easier to clean it up. It is a simple and practical tool that you can easily put away after use.
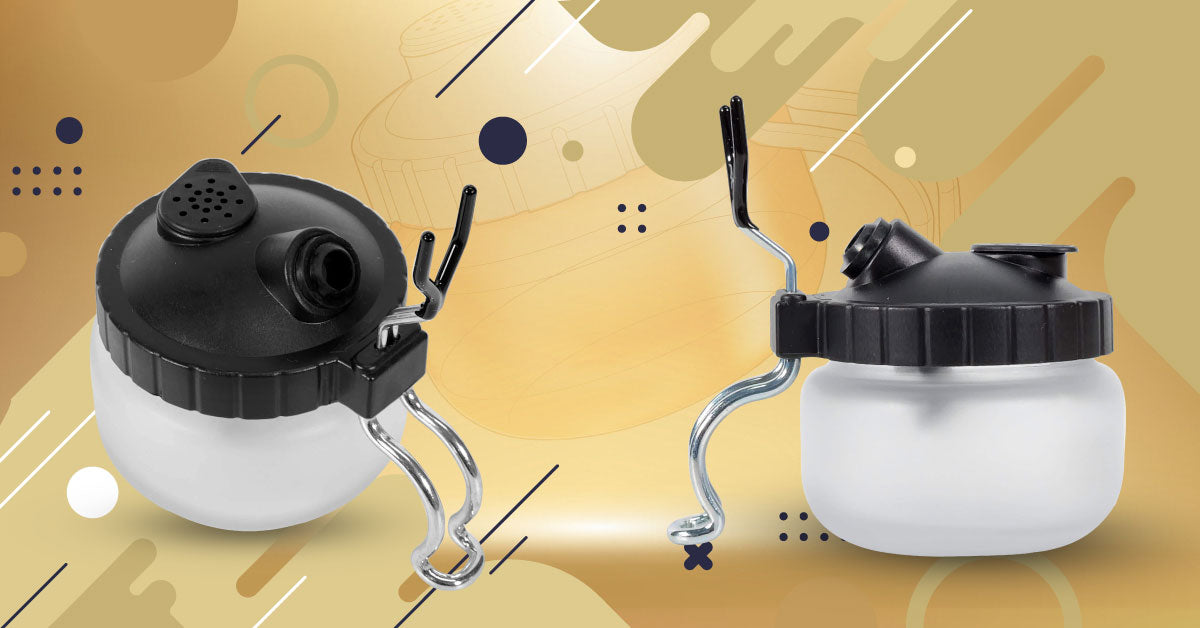
What do you get?
The pot is made of thick frosted glass, which looks and feels nice. This design also allows you to see the levels of the thinners or cleaning solution you spray inside, which makes it easier to tell when it needs cleaning. The top section of the lid has a filter that will catch most of the vapor before it goes through the top. On the underside of the lid is the baffle; when the paint hits it, it transforms the atomized paint into droplets, which makes it easier for the paint to drip down the pot and pool at the bottom. The rubber end at the top of the lid is where you will insert the airbrush nozzle to keep the vapor in and prevent backflow while you are spraying. The lid is sealed with a rubber lining that keeps the vapor inside. The box also includes the fork and the leg. Funky names, right? But what are they? The leg supports the entire pot so that it does not topple over from the weight of the airbrush, and the fork acts as the part holding onto the airbrush nozzle when it's attached to the rubber end.
A Step-by-Step Guide to Using NINESTEPS’ Airbrush Cleaning Pot
Airbrush cleaning pots are helpful add-ons that will help you spend less time cleaning up, giving you more time for other activities you might want to do.
The Preparation:
You need to put the pot together if it is brand new; otherwise, you can skip this step. First, the fork and leg have to be installed because they do not come attached to the pot.
- Simply press the fork into the pot's top point with your fingertip until you hear it click.
- Connect the leg underneath where the fork is attached. It will serve as the support that stabilizes the pot.
- Before using your cleaning pot, insert all of the spare filters, or as many as you think you'll need, inside the cap to make sure that as little vapor as possible will escape.
How To Use An Airbrush Cleaning Pot
Step One:
Pour enough thinner or water into the liquid cup to completely cover the paint that is clinging to the sides. Keep in mind that not just any water or thinner will do; use the one that is suited for the base of your paint.
Step Two:
Push the airbrush nozzle inside the rubber end and make sure it is securely fastened.
Step Three:
Pull the trigger back to have the needle fully open and press down on it so the paint goes straight in. Spray as much as you want; the several filters will stop the vapor from getting past the cap. Keep flushing the paint through until the fluid cup is clean.
Step Four:
After flushing all your paint through and making sure that there is no residual paint left, empty the pot and wipe it with a tissue or cloth soaked in solvent as many times as necessary, or rinse it with water or thinner.
Tip: You can place some tissue paper inside the pot rather than using it by itself. The tissue will serve as an additional filter and help in absorbing all the liquid. Plus, with a tissue inside, all you have to do to clean the inside of the pot after you're done is open the pot, remove the tissue, and wipe it off. With just that, your pot will practically be clean already.
One problem with these kinds of tools is that if you don't clean them regularly, the leftover paint might spoil or mold, which could damage the pot as well. By putting tissue inside, you can prevent this issue from happening.
Final Thoughts
If you are still wondering why the Ninesteps Airbrush Cleaning Pot should be in everyone’s kit, then you must not make that much mess when cleaning up after an airbrushing session. All jokes aside, this handy tool is perfect for anyone who is into airbrushing and wants to have a convenient helper to share some of the burden during clean-ups. It does not take up much space in your room and is simple to use, so why think twice? Get yours now.
Check out our collection of airbrush accessories and other knick-knacks here at Hearn’s Hobbies.
Watch and learn!
Are some of the parts still unclear to you? Then watch BJ as he showcases the Ninesteps Industries Airbrush Cleaning Pot and teaches you some tips and tricks on how to use one. Learn how to assemble your own pot and how to use it properly.
There you have it! Have an awesome airbrush experience by getting yourself simple airbrush accessories to fulfill your airbrushing needs.
Have any tips up your sleeve? Feel free to drop them in the comments section below!
Also, make sure to follow us on Facebook, Instagram, Twitter, and Twitch!