

UV resin opens up numerous possibilities for modifications and custom creations. In this blog, we'll show you how to mould pieces and level up your resin creations using the UV-cured resin from Green Stuff World and Blue Stuff World. Let's get started!
Summary
- What is UV Resin?
- What are Blue Stuff World Sticks?
- How to use Blue Stuff World and UV resin
- Watch the Video
What is UV Resin?
UV resin, or Ultraviolet resin, is a type of resin that is used by many enthusiasts in modification and replica making because of its versatility. It is frequently used in construction projects for sealing, bonding, and coating. Additionally, it can be used to create tiny jewellery pieces, beads, and other trinkets. It fully cures in a matter of minutes by using the sun's ultraviolet radiation or through ultraviolet equipment, hence the name. Since UV resin always needs a UV lamp to cure, it is suitable for limited spaces only. It is completely waterproof, glossy, and clear and offers exceptional scratch, stain, and yellowing resistance.
Green Stuff World UV Resin is an ultrafast-drying gel with crystal transparency. It can be dyed and has a strong resistance to shrinking. It is a multi-layered friendly resin that can be cut, polished, and worked easily! This UV resin features low odour and toxicity, so you do not have to worry if you're sensitive to strong smells.
What are Blue Stuff World Sticks?
Blue Stuff World Sticks are a new type of thermoplastic moulding material that can be transformed into moldable form by submersion in hot water for three minutes. You can instantly create a mould of any piece you choose by pressing the piece you want to have the mould formed from onto it without any worries of it getting stuck. It can be used to make copies by using any kind of putty, polyester resins, or even epoxy resins. It is a plastic moulding that is REUSABLE for all levels and a useful model-making tool you can use for any project that you might have in mind.
A Step by Step Guide to Resin Casting
Making resin parts can be quite enjoyable, but knowing how to do it right lessens the frustrations you will have to get through just to finally get it right. In this blog, we'll talk about using Blue Stuff World and UV resin. Let us get right into it!
The Preparation:
- Soak the Blue Stuff Sticks in hot water. Doing this will make them soft enough to be moulded. You can use as many sticks as you want, depending on what you’re going to use them for. Keep in mind that the higher the temperature, the faster it will soften.
Materials you will need:
- Blue Stuff World (Pre-soaked sticks)
- Green Stuff World UV resin
- UV Torch/Lamp
- Small Stick
- Super Glue
- Sharp Knife
How to use Blue Stuff World and UV resin
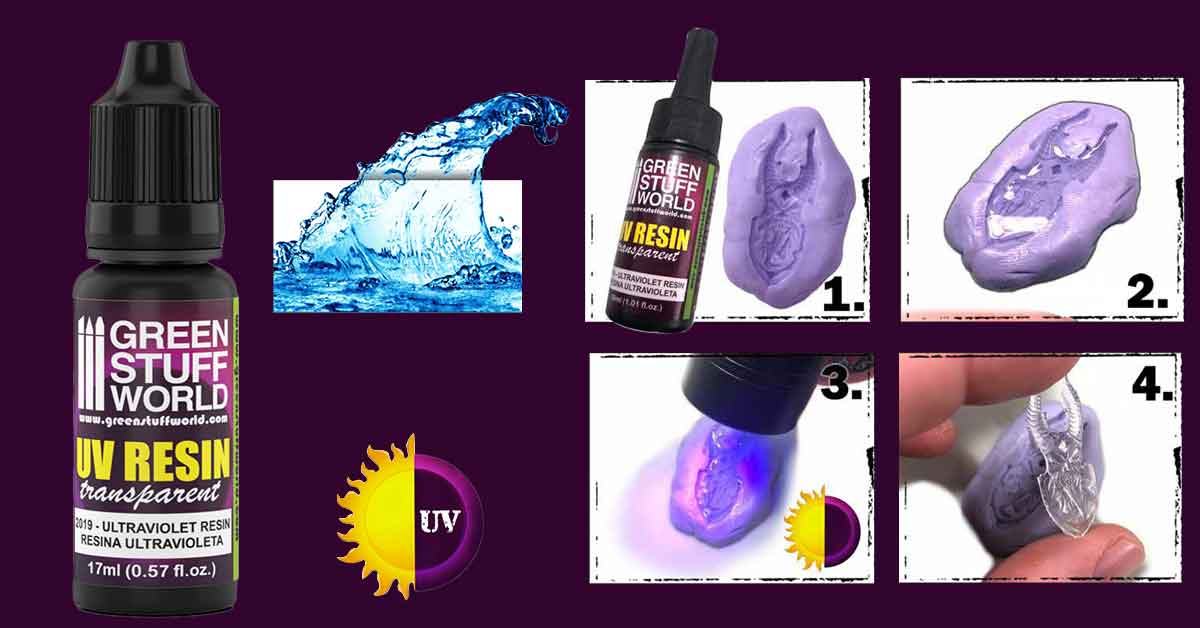
Step One: Press
Press the part you want to replicate onto the pre-soaked Blue Stuff World firmly until you’re certain that an imprint of it is left.
Tip: If you’re doing a two-piece mould, flatten the sides of the mould and create an irregular shape to easily lock two of the pieces together when it's time to join them together.
Step Two: Fill
Fill the imprint with Green Stuff World UV resin. Pay close attention as it drops out of the applicator to make sure it gets into all the nooks and crannies of the mould. Don’t worry about the excess, it can be removed once the resin is cured.
Remember that the consistency of the Green Stuff World UV resin varies depending on the temperature. When you first open it, the consistency is thick, almost like honey, but as it warms up, it can become runny as you work with it.
Tip: Swirl a small stick back and forth on the uncured resin until no visible bubbles are visible. Move the small stick around gently and avoid rashly moving it around because this can cause more air bubbles than it removes.
Step Three: Cure
To cure the resin, simply point the UV torch or lamp onto it for 2-3 minutes or until it solidifies.
Tip: If you are working with a two-piece mould, you have to first press it together before curing it. This is done to make sure that the pieces will be uniform once it's finished curing.
Step Four: Extract
Remove the cured resin from the mould. Once you remove it, you will notice that it is still bendable. The good thing about resin is that it has got a little bit of flex to it and is quite easy to work with at the early stages. This is because even if it is cured, it still has not hardened all the way through. If you let it rest for a bit more time, it will be a lot stiffer.
Step Five: Trim
Remove the excess resin by simply tearing it off if you can, or trimming it if it is too difficult to do by hand. You can use a sharp knife and run it through the edges where you want to cut the excess resin off.
This stage can be tricky since the resin can accidentally break off. If it happens, you can stick the damaged piece back on by using sonar acrylics like zapper gap or any high-quality super glue to repair it.
Step Six: Prime
Although it is optional, this step makes it much simpler to paint on the details and determine where it needs a touch-up by making it easier to see the areas that need attention.
Final Thoughts
It might take a few tries before you get your desired outcome, but all those trials and errors can be a learning experience that can equip you for your next attempts. So don’t be afraid of making mistakes and enjoy your creative process. Have fun!
Watch and learn!
Need a step by step walk through? Watch as BJ demonstrates how to replicate parts using Blue Stuff World Sticks and UV Resin.
Have any tips up your sleeve? Feel free to share it with us at hh@hearnshobbies.com!
Also, make sure to follow us on Facebook, Instagram, Twitter, and Twitch!