
Getting the most out of your tire’s performance does not start with simply installing your tyres, finding the best fit for your RC will also ensure your success. Knowing how to properly glue and mount your tyres is also one way for your RC to put on a hell of a show. Now, let’s explore some of these concepts.
Summary
- Different Compounds of Off-road Tyres
- The Difference Between Open and Closed Cell Inserts
- A Step-by-Step Guide on How to Glue Off-road Tyres
- Watch and Learn from Following our Video
Different Compounds of Off-road Tyres
Let’s start off by selecting the best compound for your tyres. Finding the tyre that is best suited for the terrain and conditions will definitely give you an advantage on the tracks. Now, what are the different types of off-road tyre compounds?
Pin Tyre
Pin tyres have a square armor, and the surface of the tyre is littered with small block treads that have a height of about 2 millimetres. These little square blocks are really good for getting through loose surfaces into the tracks, past the dust, and into the traction. It is a pretty good all-rounder that has an average road grip and an ultra-soft compound, indicated by the silver dot. The pin tyre is best suited for loose and dusty tracks.
Bar Tyre
Bar tyres has a tread height of less than 1 millimetre with an extremely soft compound, indicated by the yellow dot. It has a low road grip that is suitable for broom tracks, damp tracks, and maybe even oiled tracks.
Pin Tyire VS. Bar Tyre
These tyres can work differently in a variety of conditions, depending on how coarse the track may be. Both tyres' performance will be directly affected by wear and tear as well as the temperature of the environment where you are using your RC. So, if you are on a really coarse and abrasive track, a bar tyre may only last 10-15 minutes on the car, whereas a pin tyre will last a lot longer in these conditions. However, the bar tyre would surely outperform a pin tyre in a race held at an oiled outdoor track.
The Difference Between Open and Closed Cell Inserts
Inserts directly affect the structure of your tires and, of course, their performance. Is there really a difference between open and closed cell inserts? Let’s find out!
Open Cell Inserts
It used to be the only type of cell insert that was widely available up until the last 10 years. It has a loose foam-like structure that usually comes in one size. You can trim them off to suit your tyre, so whether you have a rounded carcass or have more of a square profile you can adjust your open cell inserts accordingly.
Closed Cell Inserts
Closed-cell technologies have come a long way. Closed-cell inserts are almost like memory foam; they are dense and hold the shape of the tyre better with minimal distortion.
Open Cell Inserts VS Closed Cell Inserts
Closed-cell inserts tend to hold their shape better; they may be a lot smaller than open-cell inserts, but these are a lot firmer. Stronger inserts that can hold the integrity of the tyre are really critical when racing modified RCs at high speeds, so in those cases, closed-cell inserts are the way to go. However, on low tracks that are severely rutted and you just cannot get your car to settle, open-cell inserts would be better. These inserts would not be as harsh on the car, particularly when riding through bumps.
The Middle Ground
Second-hand sets of closed-cell inserts are great midway points that will be a little bit softer on the skin but provide firm support. These tyres might be a little bit mushy or a little worn, but there are some instances where this would be just the thing you need.
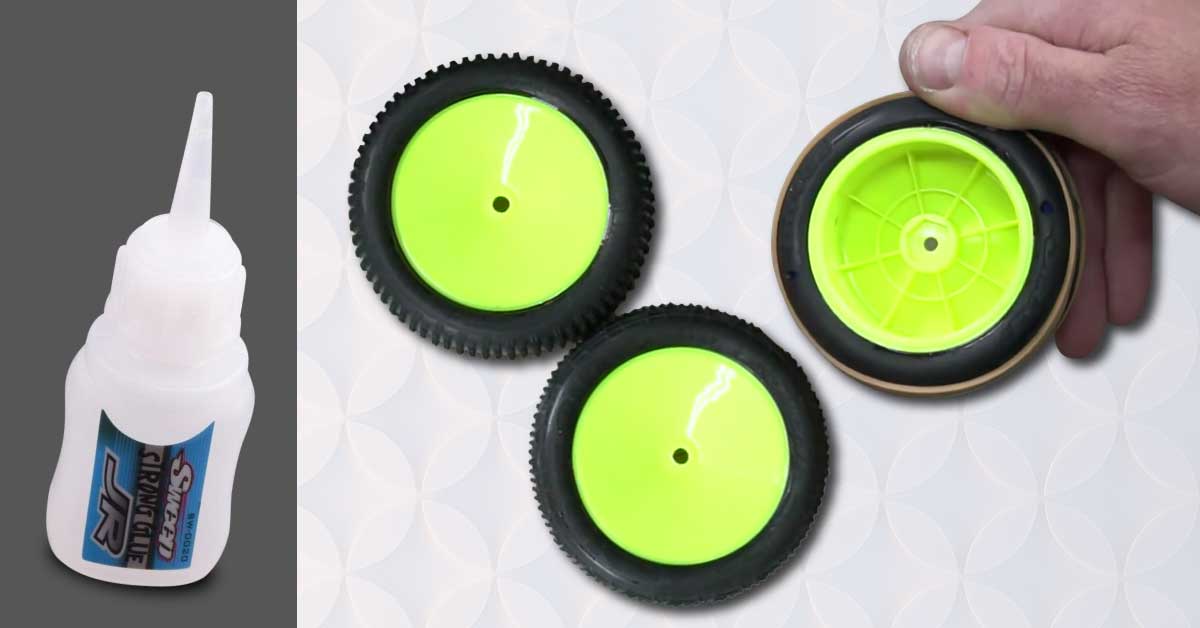
A Step-by-Step Guide on How to Glue Off-road Tyres
Properly gluing your tyres is crucial to making sure that your RC is in peak condition on the track. This simple guide will make sure that your tyres are in good shape and last a lot longer.
Materials you will need:
- Hole punch
- Cleaning Solution
- Rag or a piece of cloth
- Thin superglue
- Accelerant (Optional)
How to Glue Off-road Tyres
Step One: Punch a hole in
Using a sharp hole punch, make holes on the sidewall of the tires that are 180 degrees apart.
Step Two: Clean the tyres
Using a strong cleaning solution and a piece of rag or cloth, give the tires a good wipe all over while making sure that there will be no dirt or debris when gluing. Wipe the wheels as well.
Tip: Brake cleaner is a great cleaning agent to use on tyres.
Step Three: Bind the wheel
Using a tyre band or a large rubber band, bind both sides of the wheel evenly. This will help the tyre hold its shape when it is glued to the wheel.
Step Four: Glue the tyres
Put a few dots of thin CA glue on gradually while lifting the bead slightly. Work your way around the tyre while putting an even amount of glue around it. If you glue it well enough, you will likely never have to stress about it again.
Step Five: Work the glue in
Take the tyre band off and work the glue in gently until it is all nice and even around the bead.
Step Six: Add a second layer of glue
Add a second layer of glue to the tyre. This is a great way to ensure that the tyre is securely glued onto the wheel and that it will not come off anytime soon.
Step Seven: Let it set
Give your tyres an appropriate amount of time to set. Ideally, you want to glue your tyres the night before the race for the best results.
Tip: If you are in a rush and do not have the luxury of letting it sit for a long period of time, you can use an accelerant to speed up the drying process. But, as much as possible, letting it dry naturally would be best.
Watch and learn!
Still a bit confused? Watch Brett and Nathan as they walk you through the process of selecting, mounting, and gluing off-road tyres.
What do you want us to make a tutorial on next? Feel free to message us with your ideas!
Also, make sure to follow us on Facebook, Instagram, Twitter, and Twitch!