

Digital Upgrades for Older Model Railways: What You Need
Transform your vintage layout with modern DCC technology
We've assembled this as your practical checklist — no marketing fluff, just the essential components, installation steps, and troubleshooting advice you'll actually use. From selecting the right decoders and digital controllers to understanding which of your existing locomotives can make the transition, every section focuses on actionable information.
The world of DCC can seem overwhelming at first — decoder types, CV programming, power districts — but break it down into components and it's surprisingly straightforward. Most railway modellers find the hardest part isn't the technical installation, it's deciding which trains to upgrade first. This guide helps with both challenges, linking you to quality components from trusted brands like DCC Concepts, Hornby, and Bachmann Branchline — all available through Hearns Hobbies.
| DCC Upgrade Guide: Key Takeaways | |
|---|---|
| Why Upgrade to DCC? | Run multiple trains independently, add sound and lighting effects, gain precise control over every locomotive on your layout |
| Essential Components | Train decoders, digital controllers, power supplies, and proper wiring accessories |
| Compatibility Check | Assess your existing locomotives and track condition before purchasing components |
| Installation Process | Step-by-step decoder fitting, essential tools required, and basic soldering techniques |
| Troubleshooting Tips | Common problems and their solutions, from decoder programming to track cleaning methods |
| Product Recommendations | Tested components from DCC systems to digital accessories for beginners and experienced modellers |
| Investment Approach | Where to spend your budget for maximum impact, from single locomotive upgrades to complete layout conversions |
| Future-Proofing | Building a DCC system that grows with your interests, including automation and advanced control features |
Whether you're planning a complete overhaul or just curious about installing your first decoder, this guide provides practical knowledge paired with links to the components that'll get the job done. No theoretical discussions about the "evolution of model railways" — just the information you need to make informed decisions about your digital upgrade.
Why Upgrade to DCC?
Traditional analogue control systems force you to operate one train at a time per electrical block — it's like being stuck with a single-channel radio when you could have digital streaming. Digital Command Control (DCC) transforms this limitation by allowing multiple locomotives to run independently on the same track, each responding to its unique digital address.
The difference becomes obvious once you experience it. With analogue DC, increasing track voltage speeds up every train connected to that circuit. DCC sends digital packets of information through the rails, so locomotive A can crawl through a goods yard whilst locomotive B races past on the main line. Each decoder listens for its specific address and ignores commands meant for other trains.

Modern HO scale locomotives and N scale models often come DCC-ready or DCC-fitted from the factory. Manufacturers like Hornby and Bachmann recognise that most serious modellers want digital control. But what about those older locomotives gathering dust in your collection?
That's where decoder installation comes in. Sound decoders add authentic engine noise, horns, and bells to your trains. Function outputs control headlights, marker lights, smoke units, and other details that bring your models to life. Some digital accessories even synchronise lighting effects with locomotive sounds — imagine a diesel engine's cooling fans spinning up as the motor works harder.
The control experience changes completely too. Instead of reaching for multiple power packs and toggle switches, you operate everything from a single digital controller. Advanced systems let you store locomotive rosters, program realistic acceleration and braking curves, and even automate complex operating sequences.
Core Components Required
Building a DCC system requires four essential components, each serving a specific purpose in the digital control chain. Understanding what each piece does helps you make smart purchasing decisions and avoid compatibility problems down the track.
| Component | Primary Function | Key Considerations |
|---|---|---|
| Command Station | Generates DCC signal packets and manages system operations | Choose based on layout size and number of locomotives |
| Throttle/Controller | Interface for sending commands to locomotives | Handheld, fixed panel, or computer-based options available |
| Locomotive Decoders | Installed in trains to interpret and execute commands | Must match locomotive's motor type and available space |
| Power Supply | Provides regulated electricity to the entire system | Capacity must exceed total current draw of all active trains |
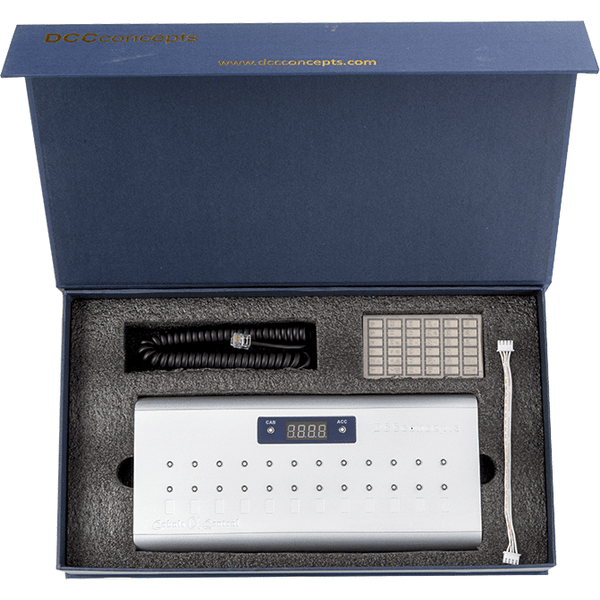
The command station acts as the brain of your DCC system. Popular units from DCC Concepts and the NCE systems range include everything needed to get started. Entry-level systems often combine the command station and throttle in one unit, whilst advanced systems separate these functions for greater flexibility.
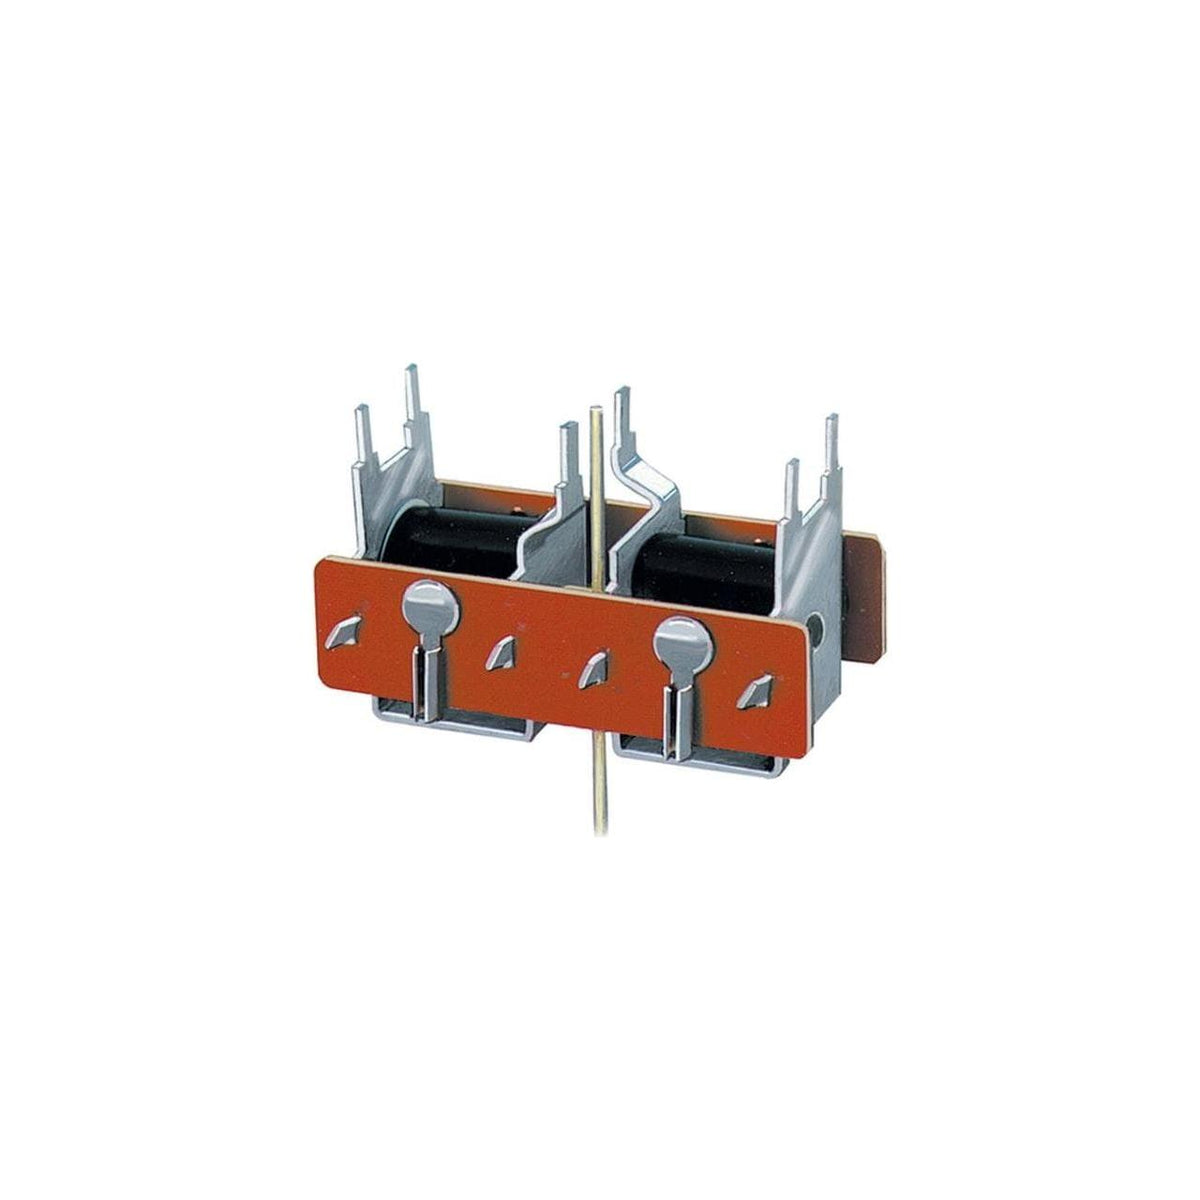
Locomotive decoders vary significantly in features and size. Basic motor-only decoders handle speed and direction control, whilst sound decoders include speakers and sophisticated audio processing. Some decoders fit standard sockets (8-pin, 21-pin), making installation straightforward. Others require direct wiring to the locomotive's motor and track pickups.
Don't overlook power requirements. Each locomotive draws current based on its motor efficiency and loading. Power supplies need enough capacity to handle your largest operational session, plus a safety margin. Undersized power supplies cause voltage drops that affect decoder performance and can trigger protective shutdowns.
Quality wiring accessories ensure reliable signal transmission. Poor connections create dead spots where locomotives lose commands or behave erratically. Track feeders, bus wires, and terminal strips might seem mundane, but they're critical for trouble-free operation.
Compatibility Considerations
Not every older locomotive can accept a DCC decoder without modification. Before purchasing decoders, you'll need to assess each model individually — some conversions are plug-and-play, others require rewiring, and a few aren't worth the effort.
Most OO gauge locomotives manufactured after 2000 include decoder sockets or DCC-ready wiring. Look for locomotives with isolated motors and separate track pickups for each rail. These design features make decoder installation much simpler. Many Hornby models from recent years fall into this category.
Older locomotives often have motors connected directly to the track pickups through the chassis. Converting these requires isolating the motor, installing separate track pickup wires, and sometimes adding a decoder mounting location. The work isn't technically difficult, but it does require basic soldering skills and the right tools.
Very small locomotives present space challenges. N scale models and narrow gauge OO9 locomotives may only accommodate micro decoders without sound. Even then, installation often requires creative mounting solutions and careful wire routing.
Track condition affects DCC performance more than analogue systems. Digital signals need clean, consistent electrical connections to function properly. Oxidised rails, dirty track, and loose rail joiners all cause signal dropouts. If your track hasn't been maintained recently, factor cleaning and electrical work into your upgrade timeline.
Test decoder compatibility before purchasing multiple units. Most suppliers, including Hearns Hobbies, can provide specific decoder recommendations for your locomotive models.
Consider your layout's electrical blocks too. DCC eliminates the need for complex block wiring, but large layouts still benefit from power districts and circuit breakers. Digital system accessories include boosters, breakers, and signal repeaters that ensure reliable operation across extended track networks.
Decoder Installation Process
Installing a decoder ranges from a five-minute socket swap to an hour of careful rewiring, depending on your locomotive's design. The process follows similar steps regardless of scale or manufacturer, though the specifics vary with each model.
DCC-ready locomotives with factory-installed sockets make installation straightforward. Remove the locomotive shell according to the manufacturer's instructions, locate the decoder socket, and plug in your chosen decoder. Most train decoders include comprehensive wiring diagrams that show the standard pin assignments for common socket types.
Hard-wired installations require more preparation. Start by documenting the original wiring with photos or sketches — you'll need this reference if problems arise later. Identify the motor leads (usually two wires) and track pickup connections (typically four wires, two per rail). Some locomotives use the chassis as one side of the circuit, requiring additional isolation work.
Essential tools include a temperature-controlled soldering iron, rosin-core solder, wire strippers, and small screwdrivers. Quality railway tools make the job much easier and reduce the risk of damaging delicate components. A magnifying lamp helps when working with tiny wires and connection points.
The installation sequence typically follows these steps:
- Preparation: Remove the locomotive shell and document existing wiring
- Motor isolation: Disconnect the motor from direct track power
- Decoder mounting: Secure the decoder using foam tape or a purpose-built mount
- Wiring connections: Solder decoder leads to motor and track pickups according to the wiring diagram
- Testing: Verify operation before reassembling the locomotive shell
Take your time with each connection. Cold solder joints cause intermittent problems that can be frustrating to diagnose later. Heat the connection point and feed solder into the joint, not onto the iron tip. Good joints appear smooth and shiny when cool.
Test the installation immediately after wiring but before closing the shell. Place the locomotive on a rolling road or short test track connected to your DCC system. Verify that the locomotive responds to throttle commands and runs smoothly in both directions.
Common Installation Challenges
Even experienced modellers encounter problems during decoder installations. Understanding the most frequent issues and their solutions saves time and prevents damage to expensive locomotives or decoders.
Short circuits top the list of installation problems. These occur when decoder wires touch each other or connect to the wrong locomotive components. Most DCC systems detect shorts immediately and shut down power to prevent damage. Always double-check wiring against the decoder manual before applying power.
Motor buzz or stuttering indicates electrical noise or poor connections. Older locomotives with brushed motors sometimes need capacitors across the motor terminals to suppress electrical interference. Some decoders include built-in motor filters, whilst others require external components.
Inconsistent operation often stems from track pickup problems. Locomotives that run perfectly on rolling roads but misbehave on the layout usually have dirty or worn track pickup contacts. Clean the track pickups with isopropyl alcohol and check that they maintain good contact with the rails.
| Problem | Likely Cause | Solution |
|---|---|---|
| Locomotive doesn't respond | Wrong decoder address or wiring error | Verify address setting and check all connections |
| Runs in one direction only | Motor leads swapped or damaged decoder | Check motor wiring polarity and test decoder |
| Erratic speed control | Track pickup problems or motor issues | Clean track pickups and check motor condition |
| Functions not working | Incorrect CV programming or wiring | Review function mapping and connections |
Programming difficulties sometimes arise with older locomotives that have electrical noise issues. If your DCC controller can't read or write decoder settings reliably, try programming the decoder outside the locomotive first. Many decoders can be programmed using a simple test circuit before installation.
Small locomotives, particularly N scale models, often have clearance issues. Decoder thickness might prevent the shell from fitting properly, or the decoder might interfere with mechanical components. Sometimes milling small recesses in the locomotive frame provides the needed clearance.
Don't overlook heat buildup in small installations. Decoders generate some heat during operation, and confined spaces can cause overheating. Ensure adequate ventilation around the decoder and avoid mounting it directly against the motor or other heat sources.
Advanced Features and Automation
Once you've mastered basic decoder installation, DCC opens up sophisticated control possibilities that transform how you operate your railway. These advanced features move beyond simple speed and direction control to create realistic operating experiences.
Momentum and braking simulation make locomotive behaviour more prototypical. Instead of instant speed changes, you can program realistic acceleration and deceleration curves that match prototype performance. Heavy freight trains take time to get moving and even longer to stop, whilst light passenger trains accelerate quickly but brake smoothly.
Function mapping allows customised control over locomotive features. Modern decoders typically provide 8-28 function outputs that can control headlights, marker lights, smoke units, sound effects, and other details. You might map function F0 to headlights, F1 to horn/whistle, F2 to bell, and so on according to your preferences.
Sound decoders deserve special mention. Quality sound installations transform the operating experience by adding authentic engine sounds, horns, bells, and random industrial noises. The sound automatically synchronises with locomotive speed and responds to throttle changes. Some systems even include dynamic braking sounds and cooling fan effects.
Automation features can handle repetitive tasks without constant manual control. Advanced decoders support automatic stopping at signals, speed restrictions through specific track sections, and even complex operational sequences. Point motors and signal systems can integrate with locomotive control for fully automated operation.
Computer control takes automation further still. Software packages can manage entire operating sessions, controlling dozens of locomotives simultaneously whilst enforcing realistic timetables and operating rules. The computer interface connects through your DCC command station, maintaining full manual override capability.
Professional Tip:
Start with basic DCC operation before adding advanced features. Get comfortable with addressing, basic programming, and troubleshooting before exploring automation and computer control options.
Budget-Conscious Upgrade Strategies
Converting an entire locomotive fleet to DCC can represent a significant investment, but strategic planning helps spread costs whilst maximising operational benefits. Most modellers find that starting small and expanding gradually works better than attempting complete conversion immediately.
Phase your upgrades based on operational priorities. Begin with your most frequently operated locomotives — these provide the greatest benefit from digital control. Secondary locomotives used occasionally can wait for later phases. This approach also lets you learn decoder installation techniques on less valuable models before tackling prize pieces.
Choose decoder features carefully. Basic motor decoders cost significantly less than full-featured sound units, yet provide the core benefits of multi-train operation and realistic speed control. Sound can be added later as budgets allow, often by replacing the basic decoder with a sound-equipped version.
Consider locomotive operating patterns when planning upgrades. Locomotives that operate together regularly benefit most from DCC conversion. A passenger service with locomotive and coaching stock that always run as a set makes an ideal early conversion candidate. Freight locomotives that switch cars individually also benefit significantly from independent control.
Group purchases can reduce per-unit costs for decoders and accessories. Many suppliers offer quantity discounts, and sharing shipping costs with other modellers helps reduce total project expense. Online forums and local model railway clubs often coordinate group purchases for popular decoder types.
DIY installation versus professional fitting represents another cost consideration. Basic socket installations are well within most modellers' capabilities, whilst complex hard-wired conversions might justify professional installation. Local model shops often provide installation services, and the labour cost may be worth it for particularly valuable or difficult locomotives.
Think about future expansion when selecting your command station and power supply. Systems that seem adequate for current needs may require expensive upgrades as your digital fleet grows. Choosing a system with expansion capability costs more initially but prevents the need to replace major components later.
Frequently Asked Questions
Can I install DCC in any locomotive?
Most locomotives can be converted to DCC, but the difficulty varies. Modern OO gauge locomotives often include decoder sockets for plug-and-play installation. Older models require hard-wiring, which involves isolating the motor from direct power connections. Very small scales like N gauge present space challenges but are still manageable with micro decoders.
How much does a basic DCC setup cost?
A starter DCC system typically ranges from $150–$380 AUD, including a basic controller and power supply. Individual decoders cost around $30–$75 AUD, depending on features like sound capability. Factor in installation tools and accessories, and expect to budget $285–$570 AUD for a complete beginner setup with one or two converted locomotives.
Do I need to rewire my entire layout?
Not necessarily. DCC works with existing track in most cases, though you'll want to ensure good electrical connections and clean rails. You can eliminate block wiring since DCC allows multiple trains on the same electrical section. However, consider upgrading older track systems if you're experiencing frequent electrical issues.
What happens if I make a mistake during decoder installation?
Most decoder installation mistakes are recoverable. Common issues include reversed motor connections (easy fix — just swap the wires) or incorrect pickup wiring. Always test with a rolling road before closing the locomotive shell. If you're unsure, many specialist tools can help diagnose problems, and decoder manufacturers provide excellent troubleshooting guides.
Conclusion
Converting your older model railway to DCC isn't just an upgrade — it's a complete transformation that opens up possibilities you never had with traditional analogue control. Whether you're running Hornby classics or mixing scales with Bachmann Branchline, digital control gives you the freedom to operate multiple trains, add realistic sound effects, and automate complex operations.
The key to a successful DCC conversion is planning ahead and choosing quality components from established brands like DCC Concepts and NCE. Start small — convert one locomotive, get comfortable with the system, then expand. Every decoder you install and every feature you add builds your confidence and expertise.