
Why Some Model Tanks Have Zimmerit Coating (And How to Replicate It)
Unlock the secrets of authentic WWII German tank textures for your scale models
In this guide, we'll break down everything about Zimmerit—where it came from, why those German tanks needed it, and give ya practical, step-by-step methods for modelling it using tools and materials you can find right here at Hearns Hobbies. Whether you've been building models for yonks or you're just getting started with plastic armour kits, this article will sort you out with the historical background and proper techniques.
Ready to add this iconic armour texture to your collection? Check out what we'll cover below.
| Zimmerit Coating at a Glance | |
|---|---|
| What is Zimmerit? | Anti-magnetic paste applied to German tanks (1943-1944) to prevent magnetic mines from sticking |
| Which Tanks Had It? | Tiger I & II, Panther, StuG III, Jagdpanzer IV and other mid-to-late war German vehicles |
| Common Patterns | Horizontal ridges, waffle patterns, zigzag and comb patterns (varied by factory) |
| Best Modelling Method | Applying putty with specialised tools or DIY implements for authentic texture |
| Skill Level | Intermediate - requires patience and attention to detail |
Need help choosing the right tools or kits for your Zimmerit project? Visit our Contact Page or explore more resources on our blog.
What Is Zimmerit and Why Was It Used?
During World War II, the German military faced a growing threat from magnetic anti-tank mines. These weren't your typical explosives—they were designed to stick directly to a tank's metal surface, often attached by infantry soldiers in close-quarters combat. To counter this threat, German engineers came up with Zimmerit—a special paste that reduced the magnetic properties of tank surfaces, making it harder for these mines to stick.
Zimmerit wasn't some fancy armour upgrade or metal alloy. It was actually a non-magnetic coating applied to specific areas of a vehicle's exterior. The paste was developed by Chemische Werke Zimmer & Co. (that's where the name comes from, by the way), and was made from a mix of materials including pine sawdust, barium sulphate, PVA glue, and zinc sulphide.
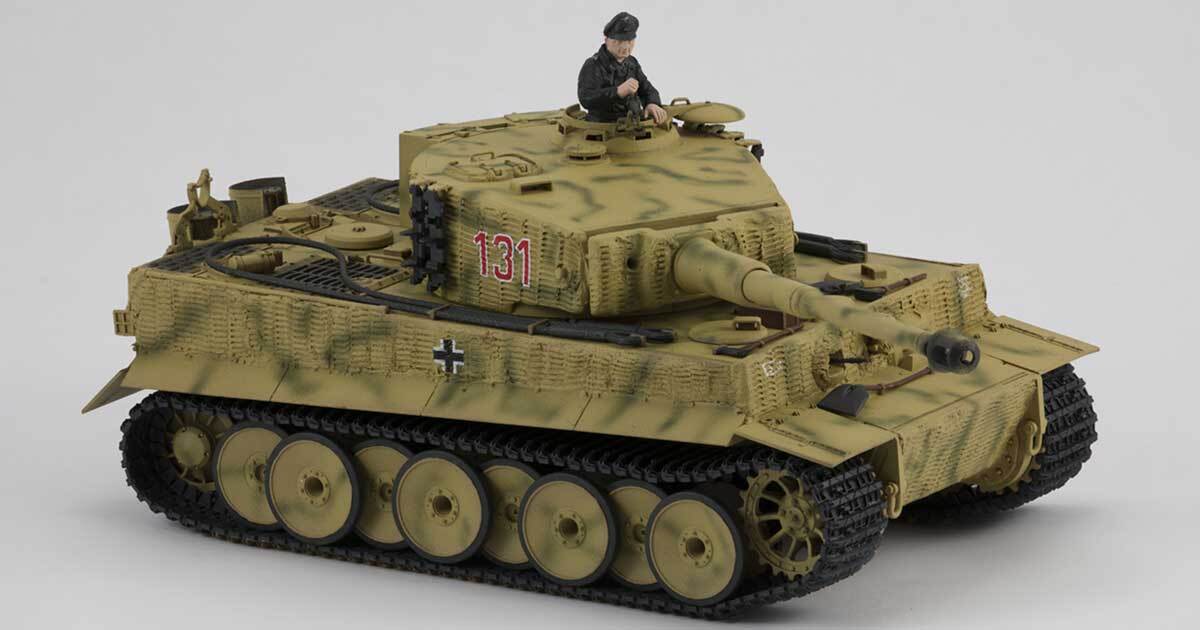
If you're building plastic armour kits of German WWII tanks such as the Tiger I, Panther, or StuG III from the right period, adding Zimmerit is essential for historical accuracy. Many modellers forget this detail, but it's a dead giveaway to enthusiasts who know their history!
Why Zimmerit Was Discontinued
Zimmerit had a surprisingly short service life—it was only used from late 1943 until September 1944. So why'd they stop using it? Well, one of the main reasons was a rumour that spread among German tank crews that Zimmerit was flammable when struck by shells. Despite official tests proving this wasn't true, the fear stuck around like a bad smell.
Another factor was that the Allies never really deployed magnetic mines on a large scale, which made the whole Zimmerit concept a bit of overkill. Plus, the coating added about 200 kilograms of extra weight to a Tiger I tank and required additional labour hours during production—not ideal when you're trying to crank out tanks quickly as the war situation gets desperate.
For the most authentic late-war German tank models, remember that vehicles manufactured after September 1944 typically didn't have Zimmerit applied. Check your reference photos carefully!
When building your scale model tanks, this timeline is dead important for historical accuracy. A Tiger I from early 1944? It should have Zimmerit. A King Tiger from November 1944? No Zimmerit needed.
Zimmerit Patterns and Application Areas
One of the most interesting things about Zimmerit is that it wasn't applied the same way everywhere. Different factories had their own methods, which resulted in a variety of distinctive textures:
| Factory | Pattern Style | Common Tank Models |
|---|---|---|
| MAN | Horizontal Ridges | Panther Ausf. A, D |
| MIAG | Waffle Pattern | StuG III G |
| Henschel | Combed Zigzag | Tiger II |
| Field Application | Irregular Patterns | Various Vehicles |
Zimmerit wasn't slapped on everywhere, either. It was typically applied to areas vulnerable to magnetic charges, such as vertical hull sides, rear plates, and turret faces. Things like storage boxes, tools, tracks, and running gear were left untouched. This varied treatment gives us modellers a great opportunity to create visually interesting surface textures on our builds.
If you're working on a Tamiya armour kit or Dragon model, many of their premium kits include factory-moulded Zimmerit. But there's something special about adding it yourself—it's a skill that separates the casual hobbyist from the dedicated modeller.
How to Replicate Zimmerit on Model Kits
Creating authentic Zimmerit on your models takes a bit of patience and the right supplies. Here at Hearns, we've got everything ya need:
- Putty Fillers – The base material for your Zimmerit texture
- Sculpting Tools – For carving those precise patterns
- Weathering Sets – To bring depth and realism to your finished texture
Let's go through a step-by-step process that'll have you adding professional-looking Zimmerit to your next build:
Method 1: The Putty Technique
- Prepare the surface – Clean the model parts thoroughly and mask off areas that shouldn't receive Zimmerit
- Apply a thin layer of modelling putty about 1-2mm thick to the tank's surface
- Let it partially set for about 30 minutes (check your putty's instructions)
- Create the pattern using a Zimmerit tool or DIY implement (see below)
- Allow to cure fully before proceeding with painting
Pro Tip:
Don't have a proper Zimmerit tool? No worries! You can make your own using an old credit card with notches cut into it, a coarse comb, or even a piece of LEGO brick edge. Just test your homemade tool on some spare putty first to get the pattern right.
Method 2: Using Pre-Made Zimmerit Sheets
If you're not keen on the putty method, you can also use aftermarket Zimmerit decals or textured sheets. These are perfect for beginners or when you're short on time:
- Measure and cut the sheet to fit your tank sections
- Apply adhesive if not already pre-backed
- Carefully position on the model surface
- Press firmly to ensure good contact
- Trim excess with a sharp hobby knife
The choice of technique often comes down to what level of control and texture you're after. The putty method gives ya the most authentic look, while pre-made sheets are quicker and more consistent.
Best Kits for Zimmerit Projects
If you're keen to try your hand at Zimmerit, certain kits are more suited than others. Here are some top picks from our range:
Tanks That Historically Featured Zimmerit:
- Tiger I (Late Production) – The iconic heavy tank that featured prominent Zimmerit application
- Panther Ausf. A/G – With its large flat surfaces, the Panther is perfect for showing off Zimmerit patterns
- StuG III Ausf. G – This assault gun typically featured the distinctive waffle pattern
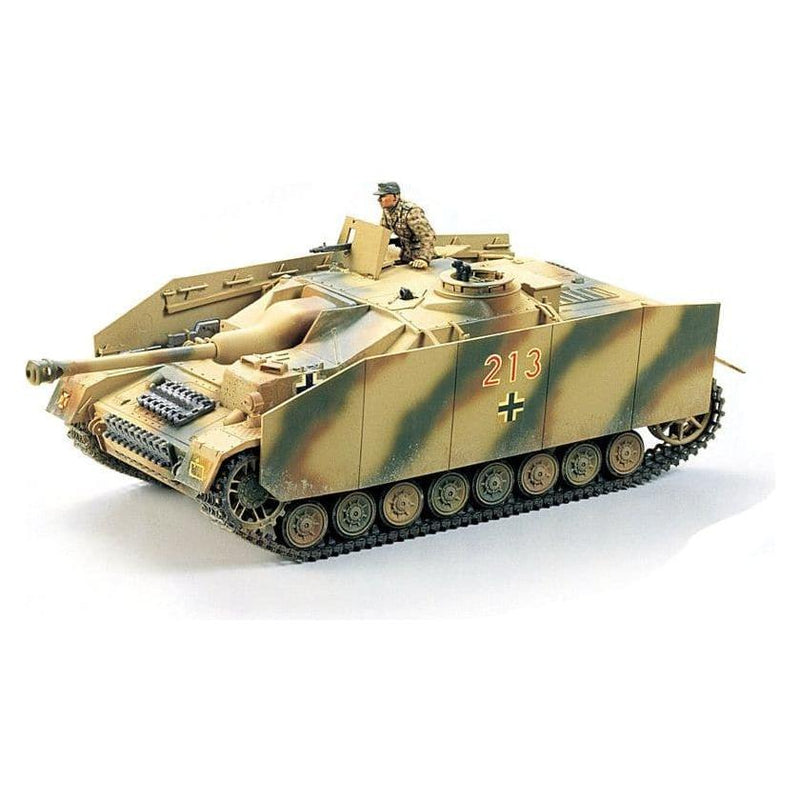
- Jagdpanzer IV – The tank destroyer with extensive Zimmerit coverage
- Tiger II (Early Production) – Some early King Tigers received Zimmerit before production was discontinued
Check out our Tamiya armour kits and Dragon armour kits collections for these specific vehicles. Many premium kits will mention in their description if they include moulded Zimmerit or are designed to be compatible with aftermarket Zimmerit solutions.
Painting and Weathering Your Zimmerit
Once your Zimmerit texture is applied and cured, proper painting will make or break the realistic effect:
- Prime carefully – Use a thin primer that won't obscure your hard work
- Base coat – Apply your tank paint colours in thin layers
- Highlight the texture – Dry-brush with a lighter shade to bring out the raised patterns
- Apply a wash – Use a dark wash to create depth in the recesses of the pattern
- Weather realistically – Add pigments and weathering effects to show how the Zimmerit would age in field conditions
The textured surface of Zimmerit actually makes weathering more effective and realistic. Mud, dust, and grime would naturally collect in the recesses of the pattern, while the raised edges would show wear from the elements.
Different weathering techniques can bring different effects to your Zimmerit:
- Dry brushing highlights the raised texture
- Pin washes enhance the depth of the recesses
- Pigments can simulate dust and dirt accumulation
- Chipping effects show wear on the high points
Remember, less is often more with weathering. Build it up gradually to avoid overdoing it and obscuring your carefully crafted Zimmerit texture.
Frequently Asked Questions
What happens if I apply Zimmerit to the wrong era tank?
Applying Zimmerit to tanks that never had it historically (like early-war Panzer IIIs or post-September 1944 vehicles) is a dead giveaway to knowledgeable modellers. Always check your references for the specific production period of your tank model. If you're recreating a specific vehicle, look for historical photos to confirm whether Zimmerit was present.
How thick should my Zimmerit coating be?
For 1/35 scale models, aim for a thickness of about 0.5-1mm. This represents the roughly 5-10mm thickness of the historical coating. Too thick and it'll look cartoonish; too thin and the pattern won't stand out properly. Apply your putty in thin, even layers and test on spare parts first to get the thickness just right.
Can I add Zimmerit to a completed and painted model?
It's possible but not recommended. Adding Zimmerit is best done before painting, as the texture affects how paint adheres and flows. If you must add it to a finished model:
- Carefully mask off any areas you want to protect
- Lightly sand the surface to improve adhesion
- Apply a very thin layer of putty and create subtle textures
- Repaint the entire affected area, including blending into existing paintwork
You'll get far better results tackling the Zimmerit stage early in your build process rather than trying to add it later.
Which Zimmerit pattern is the easiest for beginners?
The horizontal ridges pattern (like those found on MAN-produced Panthers) is generally the easiest for beginners to tackle. It requires simpler tool movements and is more forgiving of minor inconsistencies. The waffle pattern requires more precision and careful spacing to look authentic. Start with simpler patterns to build your confidence before attempting the more complex zigzag or waffle textures.
Conclusion
Adding Zimmerit to your German tank models isn't just about historical accuracy—it's about bringing an extra dimension to your builds that makes them stand out from the crowd. This distinctive texture tells a story about the fascinating innovations that emerged during WWII and the constant battle between offensive and defensive technologies.
Whether you choose to apply your Zimmerit with putty, pre-made sheets, or the moulded patterns that come with premium kits, taking the time to understand the historical context and proper application techniques will elevate your modelling skills to the next level. The textured surface also provides the perfect canvas for weathering, giving your tanks that battle-hardened look that brings them to life.
Final Thoughts:
Remember, adding Zimmerit is as much art as it is technique. Don't be discouraged if your first attempt isn't perfect—each model is an opportunity to refine your skills. The satisfaction of creating an authentic-looking finish that most casual modellers skip over entirely is well worth the effort. So grab your modelling putty, fire up your reference photos, and give this distinctive German tank texture a go on your next build—your model collection will thank you for it!