
Looking for a trusty tool to have when soldering? This pit iron set might not be a brand new release, but it is still worth sharing for those who are not familiar with this tool. The ARROWMAX Pit Iron Set is the perfect fit for every scale modeller’s kit and the tool for your every soldering need.
Buy it here: Shop now.
Summary
- What Comes in the Arrowmax Pit Iron Set?
- A Step-by-Step Guide on How To Use The Arrowmax Pit Iron & Solder
- Watch the Video
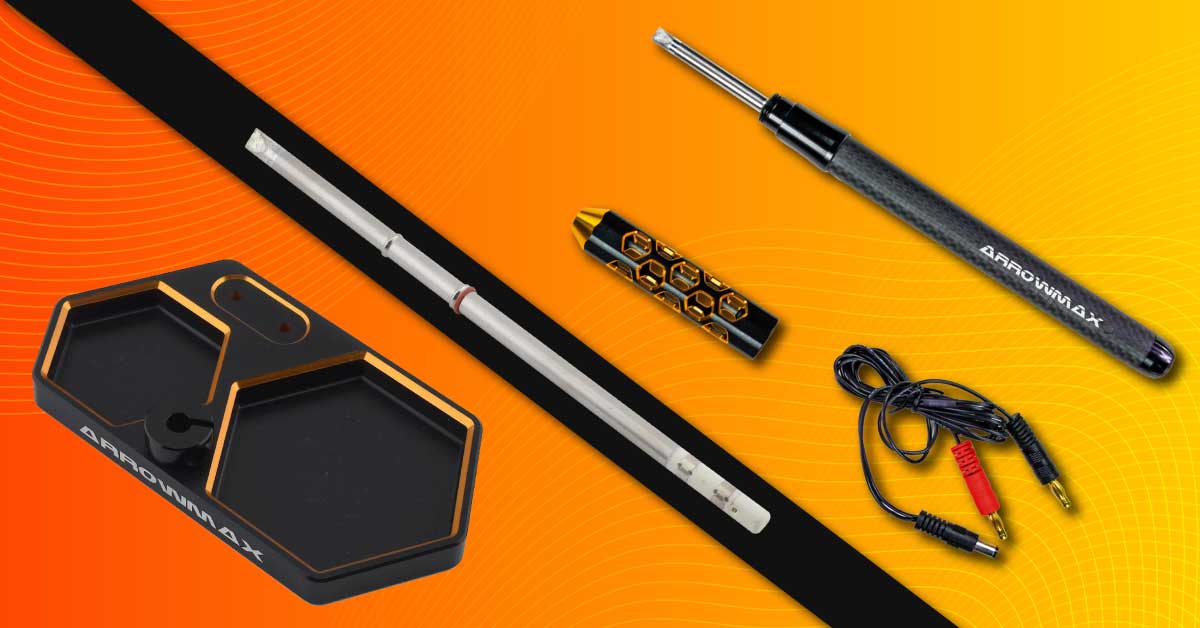
What Comes in the Arrowmax Pit Iron Set?
This trusty pit iron set from Arrowmax features a high-temperature soldering iron, a fully adjustable honeycomb iron stand, and a high-silver-content solder. The set comes in a beautiful case that fits in an average toolbox really well. It is the perfect size for travelling, whether you are on a plane, travelling interstate, or just packing in your toolbox to get to the track. Now, let us have a look at what is inside the case:
Silicon Wire
The set comes with a 4-millimetre banana plug that is designed to withstand high temperatures. This silicon wire is flexible and really easy to work with. It can plug into a power supply, a charger with a 12 volt output, or even a 3S battery.
Base
The base is made of machined aluminium iron that comes in black with gold details. It is sturdy but also quite heavy, with a sponge bed inside that should be kept nice and damp, especially during use. It is customizable, and you can put the Arrowmax pit light on it for some added features.
Get the Arrowmax Pit Iron Base here
Soldering Iron
The soldering iron has a really nice handle with a matte carbon finish and LED lights. As always with Arrowmax, it is presented very well. Its chisel tip works great with the majority of RC connectors, speed controllers, and batteries, and it has a beautiful heavy-duty construction.
Get the Arrowmax Pit Iron here
Silver Solder
The Arrowmax Silver Solder is good for working with 8-scale, high-voltage, and high-demand projects. The 2% silver solder does not always have the nicest finish, but it more than makes up for it by producing a very strong and highly conductive solder joint.
Get the Arrowmax Silver Solder here
Pivoting handle
The pivoting handle has an appealing golden honeycomb design that screws into the soldering iron. The screw-in function is a great safety feature. With it in place, you will be sure that the hot soldering iron will not tip over, fall out, and burn you, all the while being stylish too. It is a great, adjustable stand that is definitely a valuable addition to this set.
How to Install the Pivoting Handle:
Screw the pivoting handle into the base using a two and a half-millimetre Allen key. Do not screw it in too tight because doing so will stop it from pivoting. Adjust the tightness of the screw by feeling it. It is important to tighten it just enough so that you can still move the handle without it being too loose.
https://www.hearnshobbies.com/collections/rc-tools
A Step-by-Step Guide on How To Use The Arrowmax Pit Iron Set
Using the Arrowmax Pit Iron Set is really simple, you just have to follow a few simple steps and you’ll get to soldering in no time! But first, let’s prepare our materials.
Materials you will need:
- Arrowmax Pit Iron
- Arrowmax Pit Iron Base
- Solder (Arrowmax Silver Tips/Orca High Gloss Solder)
- Blu-Tack
- Plier
How To Use The Arrowmax Pit Iron Set
Step One: Plug it in
Plug the 12 volt connector into the handle. Once you plug it in, you will see a small warming light at the top. When your pit iron is ready to solder, the light will start blinking orange and green. The soldering iron will only take about thirty seconds to a minute to warm up, so you don’t need to wait long.
Step Two: Test it
Before using the soldering iron, do a heat test by touching the soldering iron lightly with solder tips to know if you are good to go. After testing, clean the tip by wiping it in the damp sponge of the base. Once it is properly heated, you can go ahead and pop the soldering iron into the handle.
Step Three: Tin the tip
Tin the tip of the soldering iron with the solder that you have on hand, it is recommended to use the Arrowmax Silver Tips or the Orca High Gloss Solder. By doing this, you can solder smoothly with no flux.
Step Four: Undoing/Redoing a solder
- If you are going to undo a solder, after tinning the tip, you can just go straight into the joints, and you will find that the soldering will come off easily.
Tip: When soldering, working on a silicon pit mat would be best. On a silicon pit mat, if you get solder on it, it will just come straight off and leave no marks. (Which would likely not be the case if you work on a fancy neoprene mat, for example; the solder will likely leave a mark somewhere.)
- If you are going to redo a solder, tin both the soldering iron and the wire. Get a nice circular blob, and with that, you can just go straight into the joints. The heat will quickly go through, so you want it to be in a nice position when it sets, so it is important to be precise.
Tip: As a soldering helper, you can use blu-tack to position the wire at the angle that you want when soldering. You can also use a plier, especially if you are aiming for precision and accuracy.
The Review
The Arrowmax Pit Iron Set is beautifully presented; this compact piece of modelling tool will surely be handy for all the modellers on the go out there. Arrowmax’s soldering iron is powerful and packs quite the punch. Their silver solder is highly conductive and also very strong. Overall, this is a really great piece of modelling tool set that you should check out if you can.
Watch the Review
Watch as Brett unboxes and demonstrates the Arrowmax Pit Iron Set. He will be showcasing everything the set has to offer and showing you how to use it.
What do you want us to unbox next? Feel free to message us with your ideas! Also, make sure to follow us on Facebook, Instagram, Twitter, and Twitch!