

5 Quick Hacks to Speed Up Your Model Kit Assembly
Transform your building experience with these time-saving techniques
From smarter prep work to tool shortcuts that actually work, these tricks'll serve you well whether you're putting together a ripper scale car kit, a military plane, or a fancy diorama. We've also included links to the essential gear and kits from Hearns Hobbies that'll take your builds from slow and frustrating to fast and bloomin' satisfying.
Ready to stop building harder and start building smarter? Let's get stuck into it, shall we?
| 5 Time-Saving Modelling Hacks at a Glance | ||
|---|---|---|
| Hack | What It Does | Essential Tools |
| Pre-Assembly Dry Fits | Spots alignment dramas early so you won't waste time fixing things later | Model Kits |
| Fast-Setting Adhesives | Cuts drying time from hours to seconds, keeps your workflow humming along | Plastic Cement |
| Batch Sanding & Cutting | Tackle multiple similar parts at once instead of the mind-numbing one-by-one approach | Cutting Tools, Sanding & Polishing |
| Build in Sub-Assemblies | Break your kit into logical chunks that are easier to manage and work on in parallel | Model Tools |
| Prime with Rattle Cans | Skip the airbrush faff for quick, even coverage that dries in a flash | Plastic Kits |
1. Pre-Assembly Dry Fits: Plan Before You Glue
Ever been halfway through a build and realised somethings not quite right? Proper annoying, innit? That's why pre-assembly dry fits are an absolute game-changer for speeding up your modelling. Before you go grabbing the glue tube, take a mo to test-fit your parts together. This simple trick helps you spot any dodgy alignment issues, parts that don't quite fit, or awkward joins well before you've committed yourself with adhesive.
A bit of early testing saves you hours of painful sanding and re-gluing later on. Trust me, your future self will be thanking you when you're not having to chip apart cemented sections cause they didn't line up proper!
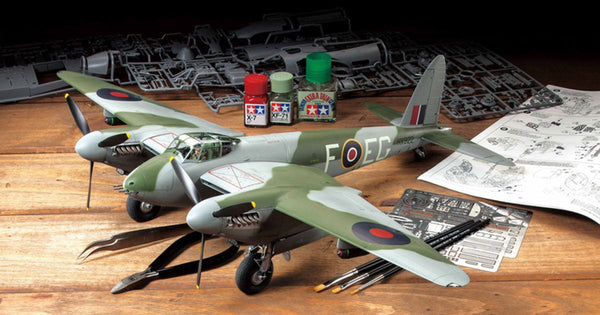
This technique is especially handy with complex builds like aircraft kits or armoured vehicles, where your internal bits can become impossible to reach once you've sealed everything up. Not being able to fix something you can see but can't reach is a special kind of frustration you don't need in your life.
Quick Dry Fit Tips:
- Use masking tape to temporarily hold sections together while you check alignments
- Take photos of successful dry fits to reference later during final assembly
- For transparent parts, test the fit before removing any protective film
- Check moving parts (like tank turrets or aircraft landing gear) function properly before gluing
Need a reliable kit to practice this method? Our beginner-friendly kits are perfect for getting the hang of dry fitting without overwhelming yourself with hundreds of tiny parts.
2. Use Fast-Setting Adhesives
If you're still using old-school slow-drying glue, ya might as well be watching paint dry (literally). Swapping to fast-setting plastic cement or CA glue can literally halve your assembly time. These sticky miracles form solid bonds within seconds, so you can get cracking on the next step without hanging about for hours waiting for things to set.
Most traditional model cements need anywhere from 30 minutes to overnight to achieve proper strength. But quality fast-setting adhesives can get you back to building in under 60 seconds! That's the difference between finishing a model in a weekend versus dragging it out for weeks.
Top Tip: Keep a bottle of glue accelerator on hand to set CA glue instantly—dead useful for tricky joins or when you're doing filler work on seams that just won't behave themselves.
Different adhesives work better for different materials, so make sure you've got the right ones in your toolkit:
- Plastic cement - Perfect for styrene plastic parts
- CA glue (superglue) - Great for mixed materials and quick fixes
- PVA glue - Ideal for wood and paper elements in dioramas
- Clear parts cement - Specially formulated for windows and transparent sections
Some of our best picks can be found in our model tools collection, each one tailored for precision and speed. And remember—a tiny drop'll do ya! Using too much glue creates more clean-up work, which defeats the whole purpose of trying to save time.
3. Batch Sanding & Cutting
Nothing slows down a build like having to constantly switch between prepping different parts. Instead of the painful one-by-one approach, try grouping similar components and processing them together. Batch-cut all your sprue connections, then sand and trim the lot at once using quality cutting tools and sanding supplies.
It's basically bringing a bit of factory thinking to your hobby bench, and fair dinkum, it works wonders for efficiency!
Setting Up a Batch Processing Workflow:
- Remove all similar parts from sprues (like all wheels, all engine parts, etc.)
- Group them in small containers by type
- Process each group with the same techniques before moving on
- Use a sanding station with multiple grit options ready to go
This method is particularly brilliant with kits from our car kit collection or quick-build range, where you've got loads of repeated parts like wheels, seats, or exterior panels.
The key is having the right tools lined up and ready to go. A decent sprue cutter paired with a selection of sanding sticks at different grits will make short work of even the trickiest clean-up jobs.
4. Build in Sub-Assemblies
You wouldn't try to eat a whole pizza in one go (well, maybe you would, no judgement), so why try to build your entire model in one linear sequence? Think modular! By breaking your project into logical sub-assemblies—like cockpit, fuselage, wings, or turret—you can paint and detail each section more efficiently.
Working with sub-assemblies has stacks of advantages:
- You can access areas that would be impossible to reach once fully assembled
- Different people can work on different sections if you're building with mates
- You can take breaks between completing sections without losing your place
- Painting becomes tons easier with improved access to detailed areas
- If you muck something up, you only need to redo a small section, not the whole model

Use precision tweezers and quality tools to handle smaller assemblies with care. For those just getting their feet wet in the modelling world, our starter sets offer perfect practice for this approach with manageable part counts and simpler construction.
| Common Sub-Assembly Groups | |
|---|---|
| Vehicle Kits | Interior, chassis, body, wheels, engine, windows |
| Aircraft Kits | Cockpit, fuselage halves, wings, landing gear, weapons |
| Military Vehicle Kits | Hull, turret, running gear, tracks, external details |
| Ship Kits | Hull, deck details, superstructure, masts, rigging |
One top tip is to use a divided container or egg carton to keep your sub-assemblies organised. Nothing wastes time like having to hunt for that tiny radar dish that's rolled under your workbench!
5. Prime with Rattle Cans
Let's be honest—setting up and cleaning an airbrush is a right pain in the neck. For a massive time-saver, grab a quality spray can primer instead. Rattle cans offer even coverage that dries super quick, making them perfect for modellers short on time or working in cramped spaces without proper ventilation for an airbrush setup.
You'll cut your priming time in half, easy. No mixing paint, no cleaning spray guns, no blocked nozzles. Just shake, spray, and you're good to go in minutes instead of the better part of an hour faffing with an airbrush.
They're a brilliant match for kits in our plastic kits collection or beginner range, and they help eliminate those annoying bottlenecks in the painting phase.
Pro Tips: Use light, sweeping passes about 15 cm from the surface to avoid pooling and overspray. And always prime in a well-ventilated area or outdoors on a still day—your lungs will thank ya!
Rattle Can Primer Benefits:
- No setup or cleanup time
- Even, consistent coverage
- Quick drying times (usually 15-30 minutes to handle)
- Available in various colours for different effects
- Perfect for batch priming multiple kits or parts
Most common modelling materials take spray primers brilliantly, including plastic, resin, and even metal kits. Just make sure you've thoroughly cleaned your parts with a gentle soap and water rinse before priming to remove any mould release agents or finger oils.
For really speedy builds, you can even use coloured primers that match your final colour scheme, potentially eliminating an entire painting step for certain sections of your model. Our paint collection includes options for every type of project you might tackle.
Frequently Asked Questions
Which modelling hack saves the most time?
It's gotta be the fast-setting adhesives, hands down. Swapping your old glue for quality CA glue or quick-setting cement cuts your waiting time from hours to mere seconds. When you're no longer sitting around twiddling your thumbs waiting for joins to set, you'll knock hours off your total build time. Check out our plastic cement collection for some ripper options that'll speed things up proper.
Do I really need to do dry fits if the instructions seem clear?
Too right you do! Even the best kits from top manufacturers can have parts that don't quite line up or fit together as expected. Five minutes of dry fitting can save you hours of frustration trying to fix cemented parts that aren't sitting right. This is especially important with complex aircraft kits where internal components become impossible to reach once the fuselage is sealed.
Can I use rattle cans for the final paint job too, not just priming?
Absolutely! Spray cans are brilliant for base colours and even some metallic finishes. They're particularly handy for larger models like 1/24 scale cars where you need consistent coverage over big panels. Just remember to:
- Build up colour with multiple light coats rather than one heavy spray
- Allow proper drying time between coats (about 15-30 minutes)
- Spray in a controlled environment away from dust and bugs
- Mask off areas you don't want painted with quality masking tape
- Consider finishing with a clear coat from our paint collection for added durability
What's the best way to organise sub-assemblies to avoid losing bits?
Losing tiny parts is a proper nightmare, so get yourself sorted with a decent organisation system. Egg cartons work a treat for keeping sub-assemblies separate, or grab some small plastic containers with dividers. Label each section with masking tape, and for super small bits like screws or antenna parts, try sticking them to a strip of double-sided tape on your workbench temporarily. Our model tools section has some good storage options to keep everything neat as a pin while you work.
Conclusion
There you have it—five dead-simple hacks that'll transform your model building from a weekend-eating marathon into a streamlined operation that actually leaves you time to admire your handiwork with a cold one when you're done. These aren't just theoretical time-savers; they're tried and tested techniques that serious modellers swear by.
Remember, the goal isn't to rush your build, but to eliminate those frustrating bottlenecks that kill your momentum and make the hobby feel like a chore. Whether you're putting together your first starter kit or you're a seasoned pro tackling a complex aircraft model, these shortcuts will help you build smarter, not harder.
Final Thoughts:
The joy of modelling isn't just in the finished piece—it's in the building process itself. These hacks aren't about skipping steps or cutting corners; they're about making your bench time more productive and enjoyable. So grab your sprue cutters, line up your sub-assemblies, and get cracking on that kit that's been giving you the eye from your shelf. Your models aren't gonna build themselves, but with these tips, you'll have them finished in half the time!